Graduate Assistantships
- College of Education Graduate Assistantship Policy
- Graduate Assistantship Background Check Form
- Graduate Assistantship Background Check Policy
- Graduate Assistantship Hiring Checklist
- Graduate Assistantship Hiring Critical Dates
- Graduate Assistantship Offer Letter Templates
- Hiring Request Form
- Non-Fringe Graduate Assistantship Job Structure
- Registrar Coding Link
Graduate Assistantship Reference Guide
Selecting the Employee
The first stage in processing a graduate assistant is to select the employee. When processing a graduate assistant you must use the student’s APID. The system verifies hiring eligibility against student information.
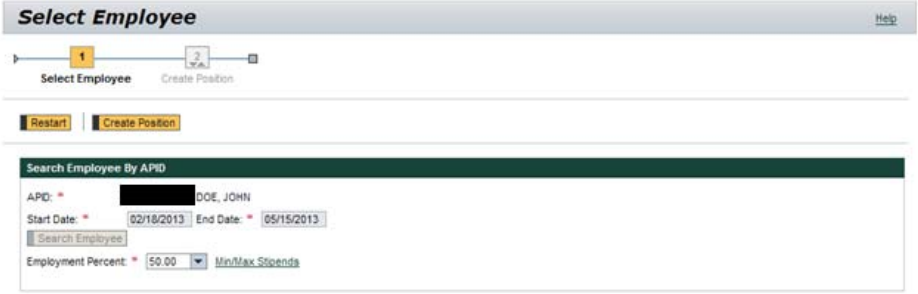
For people with existing appointments, it shows information on those appointments grouped by PERNR and sorted with the most recent appointments first, including those in workflow, so you don’t over-allocate someone. Items in workflow have a status of WF In-progress and the employee name in all capital letters for easy identification. Termination records are also included. If the appointment dates entered fall after all current appointments, only termination records appear.

When someone has existing appointments, a Yes/No question appears asking if you wish to edit an existing appointment.
- If you select Yes, the system displays a link to the graduate assistant change of status form. Changes to existing appointments are still made through this form.
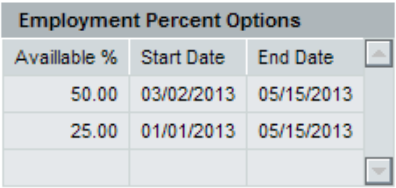
- If you select No, the system displays a table showing employment percent options per period available within the selected semester. If no entry appears for a given date range, the person is fully allocated for that period.
If you over allocate someone during the period, an error appears, and you will need to start over with a new date range.
If you over allocate someone during the period, an error appears, and you will need to start over with a new date range.
- When the graduate assistant has met the maximum employment percent allocation for the entire semester, the following hard stop occurs:

- If the dates need to be adjusted to meet the percentage allocation selected in the employment percent drop-down, the following hard stop occurs:

To select the employee
- Click on Unit Administrator > Administrative Services > Graduate Assistant: Hire/Rehire/Additional Assignment/Reappointment.
- Enter the APID
- Enter the Start Date and End Date for the assignment.
- Click the Search Employee button.
- If prompted, select No to indicate that you do not wish to edit an existing assignment. A table showing available employment percent options by period appears.
- Select an Employment Percent from the drop-down list. Click the Min/Max Stipends link for stipend information if necessary.
- Click the Create Position button.
Creating the Position
The next phase is to create the position into which the graduate assistant will be employed.
Enterprise Structure
Select the Enterprise Structure for this position. This indicates whether the graduate assistant will be a teaching assistant or research assistant, and if a teaching assistant, whether or not they are union. This selection drives options available in subsequent screens.

Position Header Information
This step provides information specific to this position. Fields on this screen change based on selections, and Grad Qualifications and Experience populates based on system information. Press Enter after entering the organizational unit to ensure all information is populated.
- The TE Exclusion Code field appears and is required for non-union teaching assistants.
- The Relevant Experience field appears and is required when selecting a Job Title higher than the calculated level. This allows you to enter justification for appointing the graduate assistant at a higher level, such as previous experience at another institution.
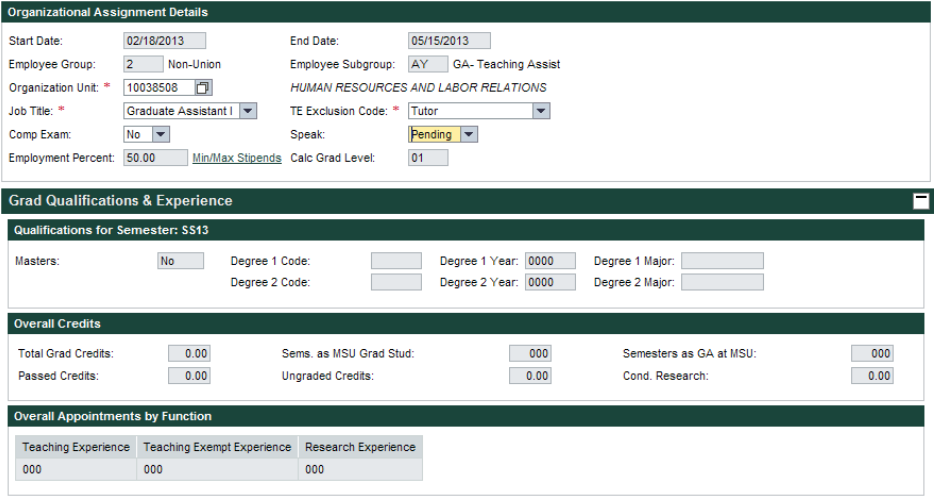
Overall Appointments by Function shows the graduate assistant’s history across all colleges and departments. Overall Appointments by University Level Org & Function Used to Determine Grad Level shows the total counts for the organizational unit and function that the graduate assistant is being appointed into for the requested semester.

To enter position information:
- Search for and select or enter the Organizational Unit of the position. Press Enter.
- Select the Job Title.
- Select the TE Exclusion Code if applicable.
- Enter Relevant Experience if applicable.
- Change Comp Exam to Yes if applicable.
- Change Speak to Yes if applicable.
- Click the Next Step Supervisor button.
Supervisor
Search for and select the Supervisor Position number. If there is more than one entry for the person, choose the entry whose dates correspond to the hiring dates. Click the Position Overview button when finished.
Position Overview
The last step in creating the position is the Position Overview. Review the position information for accuracy, clicking the tabs to view each subject. You may change editable fields as needed. Once you have determined the position is correct, click the button to proceed to the next stage. The button name displays the appropriate process based on the person’s status with the university:
- Hire Employee, if the person is new to the university.
- Re-Hire Employee, if the person was previously employed by the university but has had a break in service.
- Add Assignment, if the person is currently employed by the university.
- Reappointment, if the person has a current assignment being extended into a subsequent semester.
The new form opens in a separate window. The form title reflects the process, for example Hire. Once this window is open, the position window may be closed at any time.
Saving the Form
If at any point you wish to save the form and finish it later, click the Save Draft button at the top of the window. When you close the window, the system saves a draft of the form to your HR/Payroll Inbox. At any time you can click the link in the Inbox to open the form and complete it.
Placing the Employee in the Position
You move through the steps in the process using buttons at the top of the screen.
- Click the Next button to validate the information on the screen and advance to the next step. Any errors must be corrected before moving forward. Because options presented are based on information previously entered, you are less likely to encounter errors.

- Click the Previous button to go back to the previous screen.
You can also:
- Click any step in the Navigation Bar to go directly to that section of the form.
- Go directly to the final summary step and enter all the information on one screen.
However, these options bypass the validation that occurs when clicking the Next button. All validation occurs after you click the Check button and you receive all error messages in one long list.
Here are some additional tips for completing the form:
- Use the Tab key on the keyboard to move from field to field.
- Where you see a search button, you can press the F4 key to open the search window, rather than clicking on the button.
Personal Details
Data is populated here either from SAP for students who have been previously been employed by the University, or from the Student Information System for students who have not previously been employed. Some fields can be edited. Verify that the name matches the name on the Social Security Number card. For international students who do not have an SSN, an SSN is generated by replacing the A in their APID with two zeroes (00) and removing the last digit from the APID.
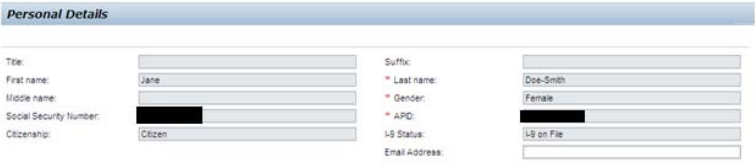
All graduate assistants who have never been employed by the University or have had a break in service of more than one year, regardless of citizenship, must have a completed Form I-9 on file. The Form I-9 must be completed within three days of the hire date and the hard copy sent to central HR. Central HR will not approve the form until they receive the hard copy of the I-9. The form will display whether a valid I-9 is currently on file for the student being processed.
To enter Personal Details:
- Complete the Personal Details for the employee.
- Click the Next button.
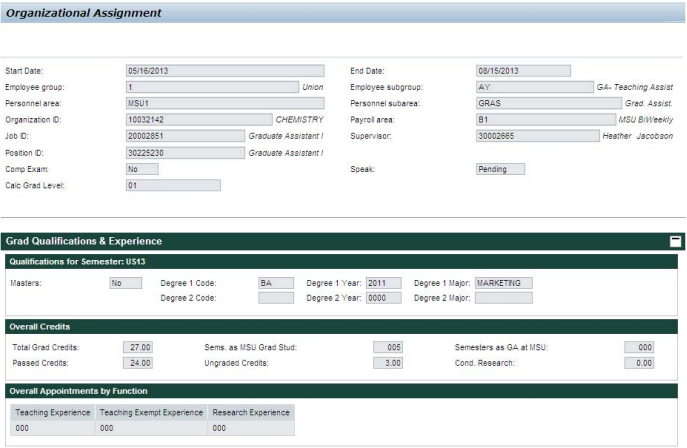
Organizational Assignment
The position information shown here cannot be edited. If any information listed here is incorrect, you must start again from the beginning. Click the Next button when you are ready to continue.
Pay and Cost Distribution
For pay and cost distribution, you enter the Pay Period Salary amount (the amount the graduate assistant will be paid each biweekly period), the different funding lines, and the dates for each funding source. The system then helps you compute the amounts to fund from each source based on either amount or percent.
When employed within the same organization unit and function (RA/TA/TE) as a previous year, graduate assistants shall not be paid less than they received in any prior year. If the graduate assistant had a previous appointment with these same attributes relative to the semester of this appointment, the previous stipend information will display to the right.

If a valid reason exists for lowering the stipend from the previous highest amount paid, please enter the lower stipend amount in the pay period salary “amount” field. After completion of the funding information listed below, a text box will appear to provide your justification for the lower stipend.
To calculate stipend:
- Enter the Pay Period Salary in the box provided.
- Press Enter. The system calculates the Total Stipend.
To enter funding lines:
- Enter a Start Date and End Date in the boxes provided.
- Search for and select a Fund. If you have created a Personal Value List, you may have to press F4 to override your personal values. If you type the account number, press Enter after typing it to default the other required accounting information.
- If necessary, search for and select other funding elements. If a WBS Element (subaccount) does not appear in a row after the account number is entered this means that there is more than one option for that account. If no sub-account is entered, WBS Element defaults to “No_Sub-Account.”
- Repeat the above steps for each additional funding line. To add more rows, click the Add Row button and repeat the above steps.
To remove a row, click the Remove Row button.
To validate cost distribution
- Click the Compute Cost Distribution button. The system creates the correct funding lines for each funding period. If only a single fund and period is selected, it populates the Amount and Pct.
- Do any combination of the following to edit each line until you reach full funding for each period:
- To enter an Amount, click Edit Amount if necessary and enter an amount.
- To enter a Pct. (percent), click Edit Percent if necessary and enter a percent.
- To calculate an amount based on a percent, click the Calculate Amount button.
- To calculate a percent based on an amount, click the Calculate Percent button.
Green or red indicators appear in the second column indicating whether or not the person is fully funded for that period.
A subtotal is included for each funding period. Ignore any total lines, which simply add up the funding period subtotals. The red circle below indicates the person is not fully funded for that period.

The buttons visible above the table change depending on what you are currently doing. If you are editing amounts, you see buttons that allow you to calculate or edit percents. If you are editing percents, the reverse is true. You can switch back and forth as many times as you wish. The image above shows editing percents.
If you need to add accounts once you’ve started computing the cost distribution or you need to change the pay period salary, click the Change/Edit Cost Distribution button. This cancels your entries and returns you to the opening list so that you can add additional funding lines or change the pay period salary. To start again from the beginning, click the Reset Cost Distribution to remove all data.
Additional Information
- Reference guide General Instructions and Tips for New HR/Payroll Forms for information on the new forms, including more specifics on topics such as error messages, auto-complete and saving drafts.
- Quick guide Personal Value Lists, on how to create and use Personal Value Lists.
Student Employment
- Hiring Request Form
- Student Criminal Background Check Form (only for students working with children or money)
- Student Criminal Background Check Process
- Student Employment Manual
- Student Hire Reference Guide
- Student Job Titles and Descriptions
- Verifying SSN for New Student Employees
Temporary/On-Call Employment
- Change of Position Reference Guide
- HireRight Disclosure and Consent Form
- Hiring Request Form
- Temporary/On-Call Hire Reference Guide
- Temporary/On-Call Employment Job Title List
Payroll
- List of Available Reports in the HR/Payroll System
- Payroll Schedules
- Payroll Timesheet
- Timesheet Record Retention Policy
Approving Time
Approve Time through Manager Self-Service
Steps
- Click on Manager Self-Service > Workplace Services > Approve Time Sheet Data.
- Under Payroll Area, select All.
- Under Reporting To, select your name.
- Click the Execute button. A list of all time to be approved appears.
- Select all time entries for approval by dragging down the list.
- Click the Approve button to approve all time entries. You can now close the window.
Variations
- At step 2, select Biweekly or Monthly to approve time for only that employee type.
- At step 3, select another name if you need to approve time for another supervisor’s employees.
- At step 5, select individual time entries by pressing the Ctrl key as you click on each row.
- At step 6, click the Reject button to reject selected time entries.
Additional Information
- Reference guide Attendance and Absence Codes Defined on the EBS Support site for key information on entering different types of time correctly.
- Quick Guide Time Approval Tips for tips on being more efficient and on recovering from common errors.
- Course Cross-App Time Sheet Approval.
Entering Time for CT Employee
Enter Time for a CT Employee in CATS
Steps
- Do one of the following, depending on your role(s):
- Click on Manager Self-Service > Workplace Services > Multiple Employee Time Entry.
- Click on Unit Time Administrator > Administrative Services > Multiple Employee Time Entry.
- Time Entry Specialists click on HR-Payroll Services > HR-Payroll Services, then double-click on Multiple Employee Time Entry.
- Click the Execute button. A list of all biweekly employees you can access appears.
- Select an employee by clicking on the button to the left of the employee name, then click the Enter Times button. The time entry window opens. Note that even though the top (Worklist) table is visible, there is no need to copy information from it as you would for an hourly employee.
- Select the attendance/absence type by clicking in the A/AType cell, then clicking the Matchcode button. Move to the date(s) and enter the number of hours in the cell. Repeat for any additional attendance/absence types.
- Click the Check Entries button to check for errors and get totals.
- Click the Save button to save and release the time. Select Yes to confirm.
Variations
- Enter criteria on the opening screen to limit list of employees.
- Select multiple employees by holding the Ctrl key as you click.
- Change pay periods in the time entry screen using the arrow buttons .
Additional Information
- Reference guide Attendance and Absence Codes for key information on entering different types of time correctly.
- Quick guide Time Entry (CATS) Tips for tips on being more efficient and on recovering from common errors.
- Course Intro to Cross-App Time Sheet
- Course Using the Cross-App Time Sheet
Entering Time for Hourly Employees
Enter Time for an Hourly Employee using MSS
Steps
- Click on Manager Self-Service > Workplace Services > General Information.
- Select an employee by clicking on the employee name, then click the Record/Display Time Data link. The time entry window opens.
- Click the Worklist button at the top of the Time Sheet. Select a permissible account by clicking on the button to the left of the account in the Worklist table, then click the Import button.
- Select the absence type (only absences can be entered in MSS) from the drop-down list and enter the number of hours in the cell for the correct date. Repeat for any additional absence types.
- Click the Save button to save the time entry.
Variations
At step 3, change weeks or move to a specific date using the arrow buttons and calendar.
Additional Information
- Reference guide Attendance and Absence Codes Defined on the EBS Support site for key information on entering different types of time correctly.
- Course Using the Cross-App Time Sheet.
- Course Cross-App Time Sheet Approval.
Entering Time for Salaried Employees
Enter Time for a Salaried Employee using MSS
Steps
- Click on Manager Self-Service > Workplace Services > General Information.
- Select an employee by clicking on the employee name, then click the Record/Display Time Data link. The time entry window opens.
- Click the Worklist button at the top of the Time Sheet. Select a permissible account by clicking on the button to the left of the account in the Worklist table, then click the Import button.
- Select the absence type (only absences can be entered in MSS) from the drop-down list and enter the number of hours in the cell for the correct date. Repeat for any additional absence types.
- Click the Save button to save the time entry.
Variations
At step 3, change weeks or move to a specific date using the arrow buttons and calendar.
Additional Information
- Reference guide Attendance and Absence Codes Defined on the EBS Support site for key information on entering different types of time correctly.
- Course Using the Cross-App Time Sheet.
- Course Cross-App Time Sheet Approval.
List of Available Reports in the HR/Payroll System
Tips for Using the HR/Payroll Forms
General Instructions and Tips for New HR/Payroll Forms
This document provides general instructions and tips for using the new HR/Payroll forms. The new forms are NOT the Adobe forms released when the HR/Payroll system went live. These Adobe forms are being gradually replaced with the new technology.
Old Adobe form

New form
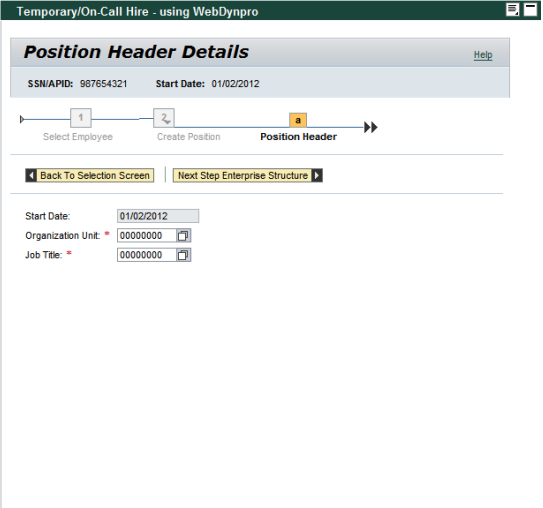
When the form is sent, it electronically routes for all necessary approvals. Upon final approval, the information is automatically entered into the HR/Payroll system.
General Instructions and Tips
General Navigation
New wizard functionality guides you through the process step by step. You move through the steps in the process using buttons at the top of screen.
- Click the Next button to validate the information on the screen and advance to the next step. Any errors on a screen must be corrected before moving forward. Because options presented are based on information from previous steps, this decreases the likelihood of errors.
- Click the Previous button to go back to the previous screen.
You can also:
- Click any step in the Navigation Bar to go directly to that section of the form.
- Go directly to the final summary step and enter all the information on one screen.
However, these options bypass the validation that occurs when clicking the Next button. All validation occurs after you click the Check button and you receive all error messages in one long list. The form cannot be submitted until all errors are corrected at this point.
You can use the Tab key on the keyboard to move from field to field.
Where you see a search button, you can press the F4 key to open the search window, rather than clicking on the button.
Form Windows
All forms open in a new browser window. When the process is complete and you receive your confirmation and reference number, simply close any form windows opened to return to the portal.
For situations where you both create a position and hire an employee (that is, fill the position) as part of one continuous process, the hire form opens in a separate window. Once this hire form window is open, the position window may be closed at any time.
Required Fields
Required fields are marked with an asterisk (*). These fields must be completed correctly before moving to the next step.
Auto-complete
Wherever possible, auto-complete functionality suggests options for filling in a field. As data is entered into any field where auto-complete functionality is available, the system displays a list of up to 50 matching values based on what has been typed into the field. The suggested values change as you continue to type.
For example, as you begin typing an organizational unit number, you first see the first organizational units, in numerical order:
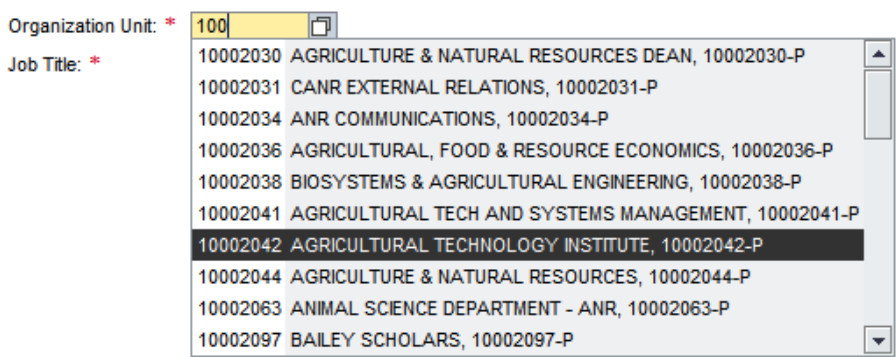
As you continue to type, the list becomes more specific:

Select the desired entry from the list to enter the value in the field.
You still have the option of searching for the value.
Note that if you have created a Personal Values List for a given field, the Personal Values List takes priority and the auto-complete functionality will not work.
Searches
Available search criteria change from one field to the next, but here are some general tips on searching for and selecting information. Searches are generally not case-sensitive, but some name searches may be. Also be aware that words may be abbreviated.
To sort items in a list or table:
- Click on the column heading.
- If necessary, ascending or descending order
To search for an item:
- If search fields are not visible, click the Show Filter Criteria button.
- Enter search criteria in one or more fields, using the asterisk (*) as a wildcard.
- Click the Start Search button. A list of matching results appears.
Dates
When you tab into a date field and type, the system automatically formats the field for you.
When you click in a date field containing slashes and type, the slashes may simply move to the right of the field. If this happens, delete the slashes to finish entering the date desired. You can also manually click and type between the slashes in the format MM/DD/YYYY, or click and drag to remove the slashes before typing.
Attachments
When you reach the step where documents are attached, required attachments are listed at the top of the section with a checkbox next to each item required.
To upload an attachment:
- Select an Attachment Type from the list provided.
- Click the Browse button.
- Locate and select the file, then click the Open button.
- Click the Upload button to upload the attachment to the form.
Repeat this process for each additional attachment.
To delete an attachment
- Select the attachment by clicking the checkbox.
- Click the Delete Attachment button.
Messages
You may receive two types of messages while filling in forms: error messages and informational messages. Messages appear at the top of the form. Only three messages are visible. If there are additional messages, a scroll bar appears. Error messages are listed first, following by informational messages and directions.
Error messages are indicated by a red circle icon. Errors must be corrected before moving to the next step.

Informational messages are indicated by a yellow triangle icon. These are not errors, but reminders or notes that may be relevant based on the data entered. For example, if you enter a retroactive hire date you may be reminded to enter retroactive working hours. If hiring a new employee, you see an I9 reminder as shown below. Click the Continue button to acknowledge the information and continue completing the form.
You may also see green messages that provide directions.
PDFs
After you check the form, and before you send the form, you can generate a PDF to view, save or print. Simply click the Generate PDF button. The PDF version of the form opens in a new window, and can be saved or printed.
As the form routes for approvals, approvers are able to view the form via the Summary Screen or as a PDF by clicking the Generate PDF button.
Browser Zoom Functionality
Increasing the zoom level of the form’s browser window above 100% may cause text descriptions or inputted text to overlap or be cut off from view. However, all information is entered and is viewable at any percent up to 100%.
Note: Increasing the browser zoom in Internet Explorer (especially to 125%) may also cause screen shake and slow performance dramatically.
Drafts
To save a draft of a form and finish later, click the Save Draft button, then close the browser window. The draft appears in your Inbox.
Note that to truly save a draft you must immediately close the form (that is, close the browser window). If you wait a few minutes before closing the form then the draft will be lost.
If a Save Draft button is not available, the form cannot be saved as a draft at that point. In some cases you may need to get to a certain point in the process before the form can be saved as a draft. For example, when hiring a temp/on-call, you cannot save as a draft while creating the position. Only when you reach the point of saving the hiring information can you save as a draft.
Instructions and Tips for Specific Sections and Fields
Employee Search
If you search for a person who has already been hired by the University, information regarding their prior employment appears. When using Internet Explorer with a maximized screen, the scroll bars do not always appear, cutting off the Short Text for the Organizational Unit information. To remedy this and see all the information, minimize the window and then maximize it again.
Enterprise Structure
The Enterprise Structure describes the position. It is a combination of the following fields. Select the appropriate combination by clicking the button to the left of the row, even if there is only one available combination.
- Employee Group: Union, Non-Union, Non-Employee/No Pay, or Retiree.
- Employee Subgroup: A further breakdown of the Employee Group. Examples include Student, Hourly Temp, Executive management AN, No Pay, Academic Year Faculty.
- Personnel Area: MSU-US or MSU-Dubai.
- Personnel Sub-area: A further breakdown of the Personnel Area. Examples include: Service Maintenance, Clerical Technical, Nurses, Faculty/Academic Staff.
Supervisor
While auto-complete is available for entering this information, you may find it more efficient to search for the supervisor by name.
To search for a supervisor:
- Click the search button.
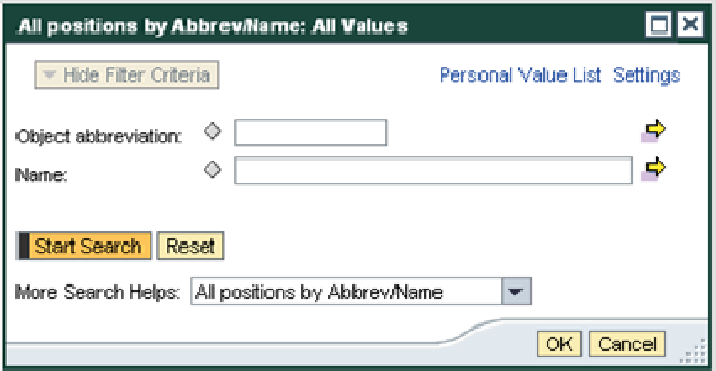
- To change search options, select one of the following from More Search Helps:
- Occupied Positions by Name, to search by a person’s name.
- Occupied Positions by Org Unit, to view a list of all occupied positions within an organizational unit.
- Enter search criteria in the boxes provided, capitalizing names and using wildcards (*) where needed.
- Click the Start Search button to view search results.
- Select an option by clicking the box to the left of the row, then click the OK button.
When selecting a supervisor, you are actually selecting a position that supervises the position being created. The relationship is position < > position, not person < > person. (If a supervisor took a new job, that person’s former direct reports would not continue to report to the outgoing supervisor. They would report to the incoming supervisor.) Auto-complete works on this field, but it is based on the supervising position number, which is typically not known. Also, autocomplete provides a list of all position numbers—including unoccupied positions—while business rules require that a supervising position be occupied by a person. If you select an unoccupied position, you receive an error.
Date ranges also apply when selecting a supervisor, if the supervising position changes. If you see multiple positions, select the one whose timeframe covers the hire being processes.
Work Locations
When identifying a work location, press Enter after entering the Location ID (also known as the building ID or building number) to populate address fields and see a valid range of room numbers for that location. If a valid room number range is available, enter a valid room number before moving to the next step. Alpha characters are allowed, though they do not appear in room number range.
You can also enter the Location ID directly. You do not have to type the leading zeros.
If the employee is working off campus, select the checkbox indicating this and then select the off-campus location. If you do not select this checkbox then you will not be able to update this information on the form. An Administrative Address is still required. If the off-campus and Administrative Address (location of where employee business mail should be received) are the same, select the same location in both fields.
Contact Information
For Emergency Contact Information, First Name is a required field. If the emergency contact does not have a first name then enter “NA” for the first name and enter a comment indicating that the emergency contact does not have a first name. HR can make the appropriate adjustments when approving the form.
The Actual Work Location phone number must be entered in the format +1AAANNNNNNNxEEEEE (+15173533121×534), as follows. This format is required in order for data to be displayed correctly via the portal or through the data warehouse. This format is only required for the Actual Work Location phone number.

When selecting from a State drop-down list, pressing the first letter of the state (or territory) name cycles to the next state beginning with that letter. For example, pressing M the first time results in Maine, the second time in Maryland, and so on.
Pay and Cost
If a WBS Element (sub-account) does not appear in a row after the account number is entered this means that there is more than one option for that account. If no sub-account is entered, WBS Element defaults to “No_Sub-Account.”
If you manually type the account number, press Enter after typing it to default the other required accounting options.
Summary
Scrolling to the bottom of the summary form may cause the pay and cost distribution table to also scroll, making it appear as though funding lines are missing. Simply scroll to the top of the pay and cost table to view the entries.
Because it is sensitive data, the person’s Social Security Number is not visible to approvers. For new hires and rehires, black dots appear to indicate that the Social Security Number was entered. For additional assignments, the field is blank because this information is already in the system. If an employee needs to change their Social Security Number they will still need to bring their social security card to HR to make the change.
Policies, Practices and Employment Law
- Employment Laws and Guidelines
- Health Assessment Policy and Procedure
- Policy and Procedure for Licenses, Registrations and Certifications
- Support Staff Policies and Procedures
- University-Wide Policies and Procedures
Support Staff Hiring Policy
Filling Regular Support Staff Positions
Policy
- The recruitment of applicants and the filling of vacant positions is the responsibility of MSU Human Resources Staffing Services.
- Michigan State University is committed to the principles of equal opportunity, non-discrimination, and cultural diversity. The University, in its employment and personnel policies and practices, will not discriminate against any individual because of religion, race, creed, color, national origin, age, sex, height, weight, marital status, or disability except for bona fide occupational qualifications.
- The University is committed to the concept of promotion from within the institution.
- The University endorses the principle of career development of its employees and will, in good faith, encourage career concepts of employment.
- All forms of recruitment, including personal contacts and media advertising, should be communicated to MSU Human Resources Staffing Services.
- MSU Human Resources Staffing Services administers certain tests under controlled conditions which provide equal opportunities for all applicants and employees. Individuals and departments may not administer any form of employee or applicant tests without prior approval by MSU Human Resources Staffing Services.
- Offers of regular employment, including salary commitments, may be made only with the approval of MSU Human Resources Staffing Services.
- Collective Bargaining Agreements specify variations in procedures for filling vacancies which may supersede the following and should be reviewed prior to filling a vacancy.
Support Staff Interview Policy
Filling Regular Support Staff Positions
Interview Policy
- The interviewing department arranges interview times for candidates listed on the interview list. Procedures vary by bargaining group.
- Structured (see Behavioral-Based Interview Questions) and consistent interviews are conducted in accordance with Equal Employment Opportunity guidelines and the Americans with Disabilities Act.
- All candidates must receive the same type of interview (i.e. phone/in-person) including the same list of questions and the same interview committee
- Structured interview documents are to be retained by the department for a minimum of three years. In the event of an official challenge to the process, these documents are to be retained until the matter is closed.
- MSU employee candidates are to be granted reasonable time away from the job to interview for University vacancies.